 In a recent post I talked about what a template in Office 365 was. I would like to suggest if you are new to this subject you read that tip first. When you first create a new document in Microsoft Word you use what is known as the “Normal Template”. This holds default settings such as the size and orientation of the paper, the margin settings, the typeface, and the font size to be used. It also includes the line spacing, the language and any content that is needed for every document you create. i.e. the footer and header with company name, standard text and logo.
You can create a specific template for each need of your company. Each template would hold content for specific reasons. Usually, companies have a set “look” designed to immediately be recognisable to the public. It means all documents emanating from that company will look similar with the same typeface and colourings. Therefore, when designing a new template, it is wise to refer to the “Company House Style” documents.
Many Companies have specific formatting needs to display their documents in the style they require and to keep them “on brand”. Having all employees use the same templates makes the “house style” evident and delivers a consistency with the company brand image. Often a company will create a template that will house that information. Using those templates makes your life easier.
Let us create a simple template together.
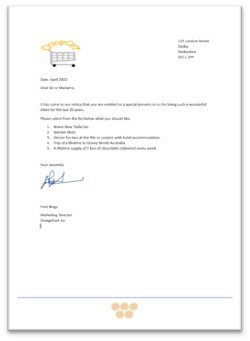
This template is going to be a letterhead document. Meaning that it will have statutory blocks of information along with the company logo and address.
Things to consider:
- Size and orientation of paper.
- Size and font of the text.
- Colours to be used.
- Margin spacing.
- Default logo.
- Default address.
- Any default text to be used.
- Any other items, such as tables or images.
Having designed your document in your head or drawn it out on a piece of paper and having checked that the House Style is adhered to, we can begin.
I like to type all the default text that is going to be displayed on the document before I play around with layout and colours etc.
Here is my example default document without any styles applied. 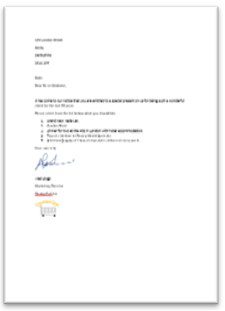
I am now going to lay this document out differently to make more of an impact. 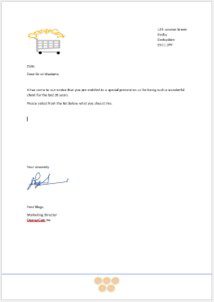
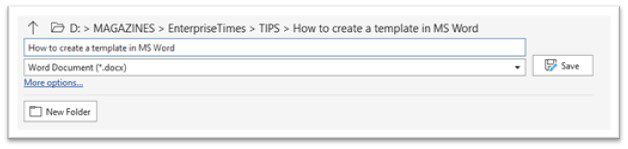
I can save this as a document at this point, and work on it over several days if need be.
How to save a document as a template
Continue evolving the document until it is ready to save as a template. You do not have to worry where to keep it as Microsoft has created a directory for all your personal templates. One thing that will help you in the future use of this template is just before saving, leave the cursor at the position of the first place you will begin typing in new text in the new document. When you create the document from the template, your cursor will be right there.
- Select [File].
- Select [Save as].
- Under the name of the file change the type from [Word Document (*.docx)] to template, [Word Template (*.dotx)].

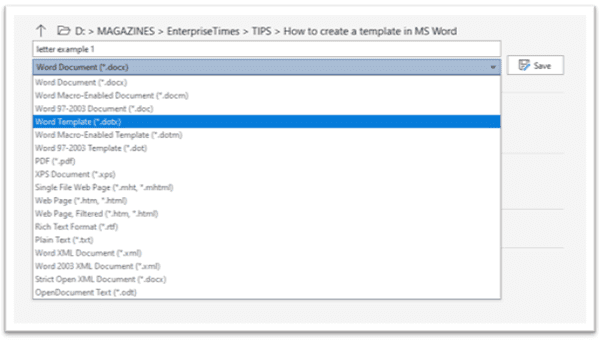
This will automatically guide you to the correct folder in the correct directory. Assuming that your IT department has not changed the default setups.
- Select [Save Button].
How to use this template in the future
Instead of using the [New tool] on your quick access bar or [CTRL+N] which will create a new document using the Normal Template we need to locate it in a slightly different way.
- Select [File].
- Select [New].
- Select [Personal] Under the image of a blank document.

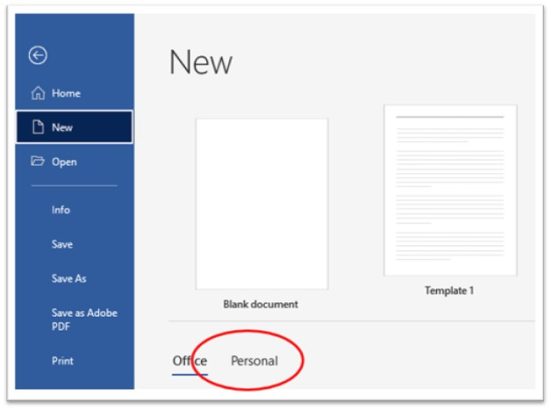
This will take you to the folder where you have just saved your template.
- Select it and a new document is presented to you where you can fill in all the information that is pertinent to this particular document.
Second time in using the template.
Once you have used this template once, the next time you come to what to use it you do not have to go to the Personal area. The template will sit alongside the Blank document image waiting for you to use again and again. Have fun creating and using templates.
One more thing
You can pin this template to this screen area. If you start to create many templates, the list will grow and templates will not be seen easily. Therefore you will have to go to the [Personal word] under the blank workbook as before.
Removing from list
If you no longer wish the template to appear in this list you can unpin it or right mouse click on the image and select remove from list.
This does NOT delete the template. It simply removes it from this first-level list.
How to update or change a template.
Should you in the future need to change anything in the template, you cannot just open the template as it always opens as a new document.
- Navigate to the folder where the template is [Custom Office Templates]
- Right mouse click on the name of the template.
This list appears. 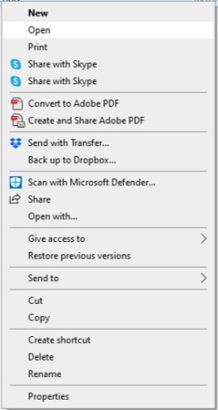
- Select Open.
This opens the template itself. Check the name at the top of the screen it should have [.dotx] after the name of the file. ![]()
- Make your changes.
- Save this template.
N.B.
CLOSE this template before you add anything you don’t need in the template itself. Create a new document using this template. when you finish the document you will be prompted to save it, where you will give it a name that is easily found in the future, and you will not overwrite the original template you created before.
Tips – Directing where you want to save your Presentation Templates


