 I am amused when I look at people’s spreadsheets where they require lots of text to be in one cell. How they go about creating this effect sometimes causes them great misery later on.
There are three different ways to achieve this. Maybe even more if you get very creative, but I’m going to show you just three. The first, and most obvious, is to use the ‘Wrap Text’ tool on the Home Tab. The second and one I personally hate is the merge and centre Tool. The third is hidden away and I shall show it to you.
Wrap Text 
This tool formats the text in a cell to fit the column width and expand the height of the cell to accommodate the text. When you extend the width of the column the text flows to that width and then you must shorten the height of the row to fit the text.
Here is an example of the text before you apply the wrap text tool. And then underneath what it looks like once you have applied and expanded the height of the row.
Merge and Centre
This tool is also found on the Home Tab just under the Wrap Text Tool. ![]()
This tool has a drop-down arrow which reveals a few choices. 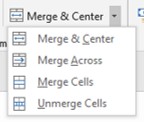
- To use this tool. Select the cell and the next few next to the one with the sentence in.
- Select the Merge and Center tool.
This is the result. 
I have purposely chosen a few more cells than those that the text would just fit. To show that it is indeed centred.
Please be careful with this tool. When you want to do filtering, sorting or Pivot tables this feature will cause you grief!
Precise wrap text
This is where you decide what text is shown on the first and subsequent lines. When you change the size of column, each line of text may be broken up, but they will not be merged. This allows greater control on what is displayed.
- Type the text you require for the first line.
- Hold down the ALT key on the left of your keyboard.
- Press the enter key.
- Type the next lines text and do the same as above. ALT+Enter.
The result will look like this. 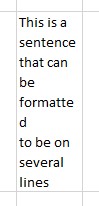
- Now make the column much wider.
This is the result. 
The row Height will initially stay the same. It does not automatically resize to fit well. You need to do that. Having widened the column and shrunk the row height the result is the text is now displayed on four lines, exactly as you required. 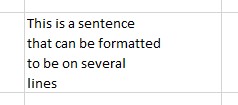
You can of course do any sort of formatting on this cell that is needed.


