
I’m always amazed that people do not protect their spreadsheets when they are used by many different people in their company. When I walk round a company to help people at their desks, I find so many of them complain that the spreadsheets they worked long and hard over have been changed. They now don’t really work anymore because people who using and working on the sheets don’t know what they are doing and overwrite some of the formulas or move things around therefore creating errors.
Protection isn’t only good when you share a spreadsheet with someone else. It also helps prevent you from accidentally making mistakes and causing formulae to work in the way you intended them to.
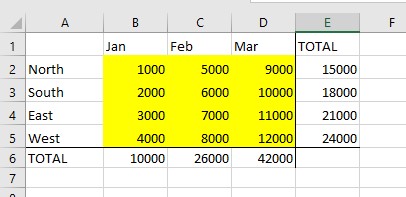
Let’s start with a simple spreadsheet containing some calculations.

There are some cells that we do not want anyone to edit and some cells where they can change the data.
I love colour for Excel spreadsheets. It helps you identify where you are working in the sheet. Therefore, I suggest that the area where you are going to allow people to edit and change should have a background colour.
Yellow is the quickest to add.
Activating Protection
- Select the area you which to be able to edit after protection is set. In my case it’s the yellow area.
- Right mouse click in the selected area.
- Select Format cells… from the list.
- Select the Protection Tab.
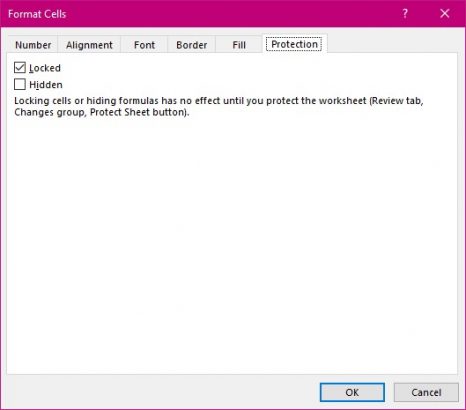
By default every cell is locked.
- Take the tick mark out of the Locked area.
- Select OK.
This now allows those particular cells to be edited when you set Protection for the rest of the sheet.
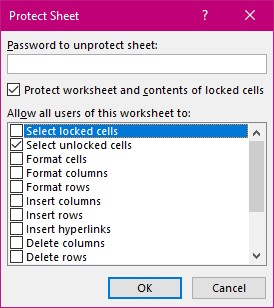
- Select the Review Tab.

The last area is called Changes and it is where you will find the Protect Sheet Tool.

Selecting this tool will result in this dialog appearing.

It is a good idea to have a password when protecting your sheet. Do Not forget Your Password. In older versions of Excel it was possible to write a piece of code to reset the passowrd. With Excel 2016 this is no longer possible. Your IT department will not be able to unprotect the sheet should you forget the password. You will have lost the sheet forever.
- Keep the tick for Protect worksheet and contents of locked cells.
In the next area the default is to be able to select locked cells and unlocked cells, but not be able to format, insert or delete cells, rows or columns. Nor will you allow anyone to sort or filter or use Pivot tables in this protected sheet. Therefore, you need to think how you will allow users to edit this sheet and tick the boxes accordingly.
- Once you have selected your settings select the OK button.
Your sheet is protected.
Protection is set
- Select any cell not in the yellow area.
- Type something new for that cell.
You will be presented with this message box.

- Now select a cell in the yellow area and type something new.
- Press Enter.
This is an allowable step so no error or message boxes appear. The formulae at the end of the row and column will recalculate due to the change of data.
This is a simple way of protecting your spreadsheet form being potentially destroyed. But this is not the best way to make sure that if someone really wants to change the formulae or do something that you don’t want then to do that they can’t. Because you have allowed them to select locked cells they can also select the entire or part of the spreadsheet.
hey can copy this area and paste the information into a new sheet or workbook and the result will not be protected. If you are happy for them to be able to do this then you need not change anything. If you are not happy that someone will plagiarise your work then return to the Protection Dialog box and remove the tick from the allow to select locked cells.
Now no one can select an area that is locked and be able to copy and paste it into a new sheet.
If you have 256 sheets and wish each and every one to have protection on parts of them then you have to do this one by one. Have fun and don’t forget the password.


