")
I’m sure many of you get so very frustrated when you have typed a lot of text then look up at the screen to see that it’s been typed in the wrong case. What you wanted in lower case is in upper and vice versa. I find it amazing that no one has told you that you do not need to delete what you have typed and start again. Changing the case of the text is so very easy and I’m going to tell you how in this tip.
Autocorrect option
- Select File Tab.
- Select Options from the list.

You are presented with this dialog box where you select Proofing from the list on the left.
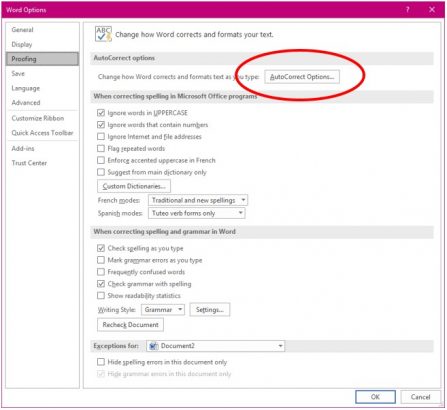
- Select Autocorrect Options button at the top right of this box.
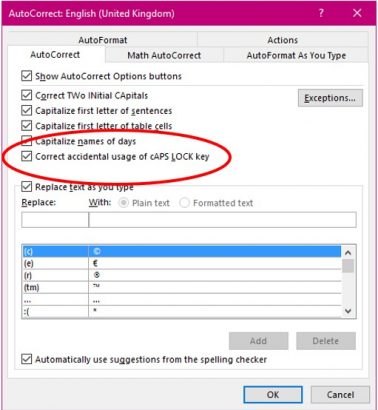
- Deselect the Correct Accidental usage of the Caps Lock Key.
I shall now type something without knowing this setting has been changed and therefore I shall hold down the shift key for the first letter assuming that it will type in capital. I then will let go of the shift key and assume that anything I type after will be in lower case. But it won’t be!
With the Autocorrect setting for the accidental usage of the Caps Lock Key not on, you can see that the words have been spell checked and flagged but not changed to be correct.
Go back into the Options and Proofing and Autocorrect settings and Check the box for the ‘Correct Accidental usage of the Caps Lock Key’. Word will automatically change the text into this as well as take off the caps lock key for you.

Change Case tool
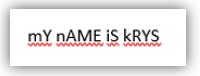
If we go a little further and type something like this.

As you can see I have managed to press the shift key at the wrong time to get capitals for the second letter in the word and not the first. Easily done if you’re too quick or too slow, depending on how you look at it.
- Select the entire sentence you need to change.
- Select the change case tool in the Home tab.

As you can see a list appears with 5 different choices.
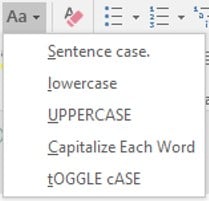
- The first, Sentence Case means that Word is looking for full stops and will make the next letter a Capital.
- The second, lowercase means that all letters will be turned into lowercase.
- The third, Uppercase means that all letters will be changed into upper case.
- The forth, Capitalize Each Word means that each word will start with a capital.
- The fifth, toggle case, means that what ever is upper will be changed into lower and whatever is lower will be changed into upper.
The short cut key
There are times when the keyboard is far quicker than the mouse. This is one of those times.
- Highlight the entire sentence or part that you want to change.
- Hold down the SHIFT key and press F3. This key has three selections so you can press F3 as many times as required to get the effect required.
This is also available in PowerPoint and Outlook, sadly not in Excel.


I followed your instructions to the “T” and I the Change Case feature has not effect on what I try to correct. I cut and paste address from our data base and the name and address are always in all Caps and I used to be able to use the Change Case feature and change to Capitalize the first letter in the first word. Would you have any other ideas?
Hi, sorry to hear you have problems. I assume that the database is not a Microsoft application. There may be further formatting that carries across from this database, when you copy and paste into Word. I suggest you highlight the address and use Clear formatting in the Styles section before using the Change Case. If that doesn’t work, when you paste the text into Word use “Keep text only” option from the list that appears on right mouse click. Then Change Case. Hope this works.