
This tip is the third in a series of four tips about different ways of creating a table in Word. I have already shown you how to insert a simple table from the Insert tab, draw a table and now I’m going to explore the excel table. Or rather how to insert an Excel spreadsheet in Word.
I have been witness to some people creating a table then laboriously counting the columns and rows so as to create formulas to calculate stuff. Or using a calculator and then transposing the numbers. I find this very dangerous as some people can be dyslexic with numbers when transposing them from a calculator to a page in Word. If you need to do some calculations that are not the straight forward add up the cells above type then using excel is the best way to go.
If you already have the information and calculations worked out in Excel, there is no need to redo the whole thing in Word. Simply copying the area in question and pasting it into Word is the simplest and easiest thing to do.
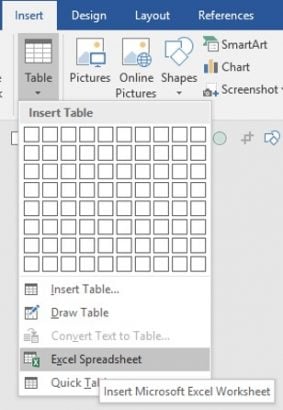
How to insert an Excel Spreadsheet.
From the Insert Tab.

-
-
- Select the Table tool.
-

-
-
- Select Insert Excel spreadsheet from the list.
-
This is what appears.
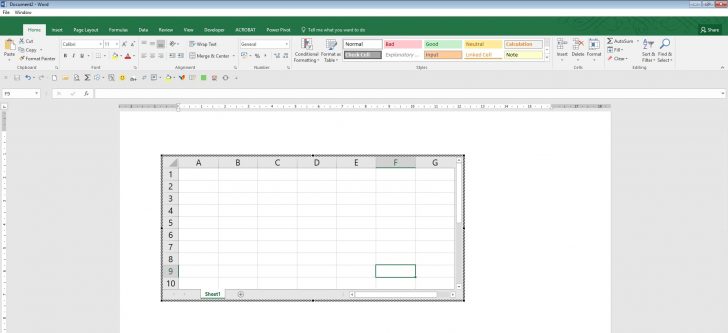
This is Excel inside Word as it were. Look at the Ribbon. You’re not in Word any more but in Excel.
You can perform everything you usually do in Excel.
-
-
- Once you have finished ether inputting new data and using functions, click beyond the “spreadsheet” into your word document and the result looks like this.
-
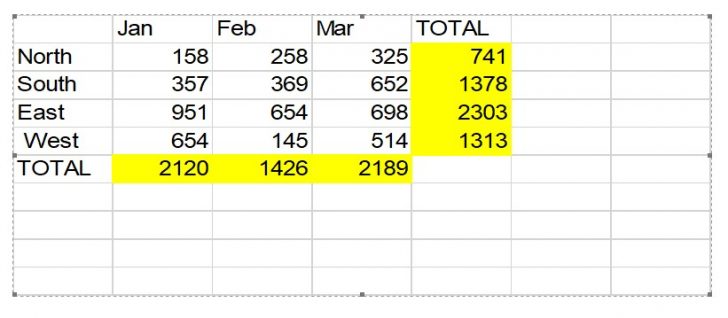
Notice the handles in all four corners and in the centre of each side. These can be used to adjust the size of the image of the spreadsheet.
How to edit an inserted excel spreadsheet.
If you need to make some changes to the spreadsheet. Double click in any cell and you are transported to Excel just as before to be able to do everything you usually do there.
Simple Copy and Paste
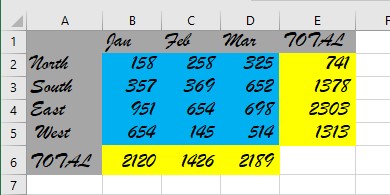
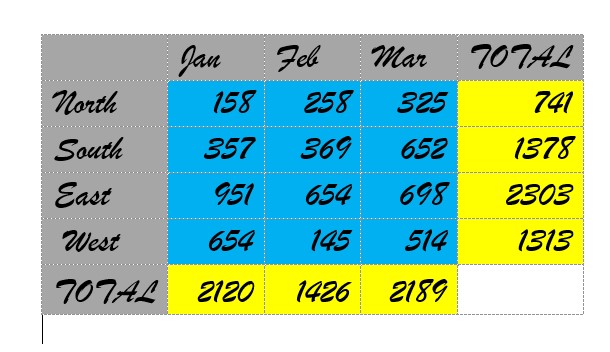
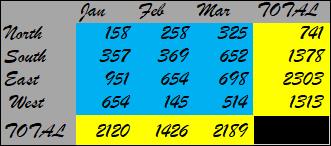
Here is an example of a simple spreadsheet with calculations.
-
-
- Select the area and copy it.
- Move to Word and right mouse click in the place where you require the portion of spreadsheet to appear.
-
In the list that appears you will find several options to pasting.
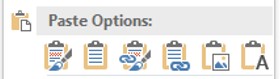
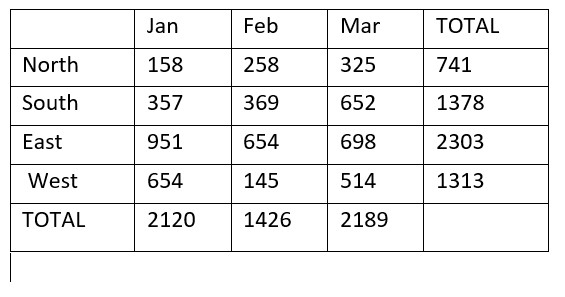
- Keep source formatting.
This will come across as a table that will have the formatting from Excel and not change with the formatting you have in Word. You can edit any cell in this table. You can reformat it to your requirements.
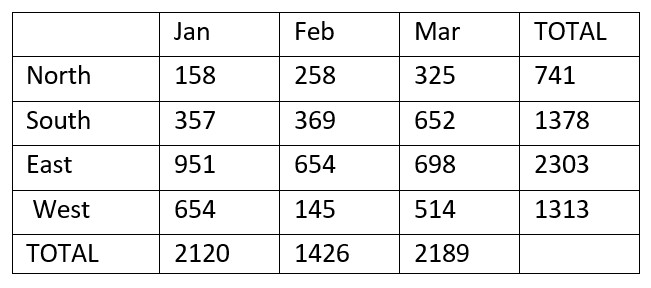
2. Use destination formatting.
This will come across again as a table but have the formatting as set by you in Word.
3. Link and keep source formatting.
This is a very useful choice. If the original file in Excel changes then this one in Word will update too.

4. Link and use destination styles.
Same as above but with Word’s formatting styles.
5. Picture.
This looks like a table but cannot be edited as it is a picture.
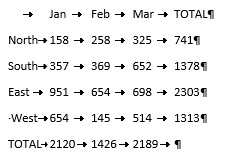
6. Keep text only.
This comes across as a tab delimited text. ( I have revealed the non-printing characters using the non printing character tool from the Home tab in the Paragraph section) for you to see the tabs.
![]()
This can be edited in the normal way as you would if you had created it in word to begin with. Just don’t forget to turn off the non-printing characters before you finish and print the document.


